
Getting started
Mailer step by step
To start playing with the mailer service you need:
- The internet connection (only to pull docker images from dockerhub)
- Installed docker and docker-compose (optional but it will save you a lot of time)
After that please follow steps:
- Create a directory where we will be playing with the mailer service:
mkdir mailer-service-playground
- Go to the directory:
cd mailer-service-playground
- Create the directory for email templates.
mkdir mail-templates
- Go to the mail-templates directory:
cd mail-templates
- Create the directory for your first simple email template. Let's call it hello-world
mkdir hello-world
- Go to the hello-world directory:
cd hello-world
- Create two (.pug) files one for email subject second for email content
touch subject.pug
touch content.pug
Note: Every template is stored in mail-templates directory.
The structure of that directory should be as follow:
mail-templates:
  you-template-name:
    subject.pug - template for subject
    content.pug - template for content
- Open subject.pug
open -e subject.pug
- Write a subject for your email template e.g
|Hello World
- Open content.pug
open -e content.pug
- Add email content by using PUG syntax
h1 Hello #{username}
p How are you?
- Back to mailer-service-playground directory
cd ../..
- Create docker-compose.yml:
touch docker-compose.yml
- Open docker-compose.yml:
open -e docker-compose.yml
- Copy and paste the example service configuration and save the file
version: "3.7"

services:
  mailer:
    image: tshio/mailer:latest
    command: "api"
    environment:
      TRANSPORT_SMTP_HOST: mailhog
      TRANSPORT_SMTP_PORT: 1025
      TRANSPORT_SMTP_SECURE: "false"
    ports:
      - 50080:50050
    volumes:
      - ./mail-templates:/app/services/mailer/mail-templates
    hostname: mailer
    depends_on:
      - mailhog
    networks:
      - app

  mailhog:
    image: mailhog/mailhog
    restart: always
    networks:
      - app
    ports:
      - 1025:1025
      - 8025:8025

  redis:
    container_name: redis
    image: redis
    ports:
      - 6379:6379
    networks:
      - app
networks:
  app:
- Run docker-compose:
docker-compose up
Now you can go to http://localhost:50080/api-docs/#/ and check if everything works fine.
We can send our first email from mailer service:
Click green bar, then "Try it out" button
Copy a sample request body with required data
{
  "emails": [
    {
      "sender": {
        "name": "Administrator",
        "email": "admin@example.com"
      },
      "recipient": {
        "to": [
          "example@example.com"
        ]
      },
      "template": {
        "id": "registration",
        "parameters": {
          "username": "example@example.com",
          "password": "******"
        }
      },
      "attachments": [
        {
          "fileName": "some-empty-file.txt",
          "content": "IA=="
        }
      ]
    }
  ]
}
Click "Execute" button
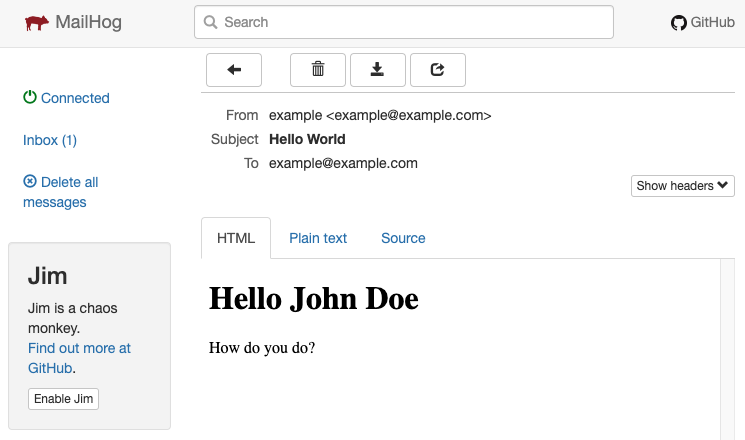
Open your browser and go to http://localhost:8025/ where you will find MailHog. There you can check the email with was sent through the mailer service.
Note: In this example, we mock the SMPT server with MailHog, so we don't need to have any SMPT server. For production usage we need to provide valid TRANSPORT_SMTP_HOST, TRANSPORT_SMTP_PORT, TRANSPORT_SMTP_AUTH_USER, TRANSPORT_SMTP_AUTH_PASSWORD (you can find more in Advanced configuration section)
How to send single email?
const body = {
  emails: [
    {
      sender: {
        name: "Administrator",
        email: "admin@example.com"
      },
      recipient: {
        to: [
          "example@example.com"
        ]
      },
      template: {
        id: "registration",
        parameters: {
          username: "example@example.com",
          password: "******"
        }
      }
    }
  ]
}

fetch("http://mailer:50050/api/mailer/send", {
  method: "post",
  headers: { "Content-Type": "application/json" },
  body: JSON.stringify(body)
});
How to send same email to more than one user?
const body = {
  emails: [
    {
      sender: {
        name: "Administrator",
        email: "admin@example.com"
      },
       recipient: {
        to: ["no-reply@example.com"],
        bcc: [
          "example1@example.com",
          "example2@example.com",
          "example3@example.com"
        ]
      },
      template: {
        id: "important-information",
        parameters: {
          message: "Very important information."
        }
      }
    }
  ]
}

fetch("http://mailer:50050/api/mailer/send", {
  method: "post",
  headers: { "Content-Type": "application/json" },
  body: JSON.stringify(body)
});
How to send multiple different emails at once?
const body = {
  emails: [
    {
      sender: {
        name: "Administrator",
        email: "admin@example.com"
      },
      recipient: {
        to: [
          "example@example.com"
        ]
      },
      template: {
        id: "registration",
        parameters: {
          username: "example@example.com",
          password: "******"
        }
      }
    },
    {
      sender: {
        name: "Administrator",
        email: "admin@example.com"
      },
       recipient: {
        to: ["no-reply@example.com"],
        bcc: [
          "example1@example.com",
          "example2@example.com",
          "example3@example.com"
        ]
      },
      template: {
        id: "important-information",
        parameters: {
          message: "Very important information."
        }
      }
    }
  ]
}

fetch("http://mailer:50050/api/mailer/send", {
  method: "post",
  headers: { "Content-Type": "application/json" },
  body: JSON.stringify(body)
});
How to send email with an attachment?
const data = await fs.readFile("test-attachment.json", { encoding: "base64" });

const body = {
  emails: [
    {
      sender: {
        name: "Administrator",
        email: "admin@rad.com",
      },
      recipient: {
        to: ["example1@rad.com"],
      },
      template: {
        id: "information",
        parameters: {
          informationMessage: "Some information text",
        },
      },
      attachments: [
        {
          fileName: "test-attachment.json",
          content: data,
        },
      ]
    }
  ]
}

fetch("http://mailer:50050/api/mailer/send", {
    method: "post",
    headers: { "Content-Type": "application/json" },
    body: JSON.stringify(body),
});
How to prioritize or postpone emails sending?
Sometimes an app needs to send many emails, and what if we want to send a new email immediately? The Mailer service allows prioritizing email send by optional property priority. The property as default is equal to 0, and if you want to postpone an email send, you should set it to 1 after that emails with priority property sets to 1 will be put on the queue and send in batches in the specific period. In the Advanced configuration section, you can find configuration properties (BATCH_SIZE and BATCH_PERIOD) with are responsible for postponing email send.
const immediatelyEmails = {
  emails: [
    {
      sender: {
        name: "Administrator",
        email: "admin@example.com"
      },
      recipient: {
        to: [
          "example@example.com"
        ]
      },
      template: {
        id: "registration",
        parameters: {
          username: "example@example.com",
          password: "******"
        }
      }
    }
  ]
}

const delayedEmails = {
  emails: [
    {
      sender: {
        name: "Administrator",
        email: "admin@example.com"
      },
      recipient: {
        to: [
          "example@example.com"
        ]
      },
      template: {
        id: "registration",
        parameters: {
          username: "example@example.com",
          password: "******"
        }
      }
    }
  ],
  priority: "high"
}

fetch("http://mailer:50050/api/mailer/send", {
  method: "post",
  headers: { "Content-Type": "application/json" },
  body: JSON.stringify(delayedEmails)
});

fetch("http://mailer:50050/api/mailer/send", {
  method: "post",
  headers: { "Content-Type": "application/json" },
  body: JSON.stringify(immediatelyEmails)
});
Note: Even if we call the function to send delayed emails first, and immediate emails later. The immediate emails will be sent first.
How to create custom email template?
We use PUG syntax in our templates. All email templates are in the mail-templates directory. The directory structure should look like:
mail-templates:
  you-template-name:
    subject.pug - template for subject
    content.pug - template for content
Remember to map Volumes in the docker-compose.yml
volumes:
      - ./mail-templates:/app/services/mailer/mail-templates
To create a new template, you need to add a new directory into mail-templates with two files: subject.pug, content.pug. So if we want do add new hello-world template it should look like:
mail-templates:
  hello-world:
    subject.pug
    content.pug
Inside subject.pug put the email template subject:
|Hello World Subject
Inside content.pug put the email template subject:
h1 Hello #{username}
p How are you?
const body = {
  emails: [
    {
      sender: {
        name: "Administrator",
        email: "admin@example.com"
      },
      recipient: {
        to: [
          "example@example.com"
        ]
      },
      template: {
        id: "hello-world",
        parameters: {
          username: "John Doe"
        }
      }
    }
  ]
}

fetch("http://mailer:50050/api/mailer/send", {
  method: "post",
  headers: { "Content-Type": "application/json" },
  body: JSON.stringify(body)
});